HMI – User Controls

I still have some work to do on the basic drawing/HMI engine, but will soon be focusing entirely on what I call “furniture” as in pre-made controls we can use. I will create some fancy, build in controls, but the most important one is a “User Control” enabling us to create custom controls. Now-keep in mind that the entire HMI is specified in XML format and loaded as we start the HMI Browser, so a custom control will need to be loaded as part of this. For the Designer, we would like to have a library that is made available, but only those that are used to be included in the final XML.

The User Control itself needs to be built from other controls and by adding colors, scaling, rotation etc to create a new control. This means our user control will be a list of build-in controls where we create our own, new interface. As input values can transform to position or rotation we should be able to create most controls these ways.

To enhance our customization capabilities, we have Polygon and Plain. I don’t want to dig into the same security problems as ordinary browsers, so the Plain VM will only have access to HMI Browser, not any of the host OS capabilities. If we need the later we will have other options for that.

Actuator-/Sensor-Design

Making an Actuator- or Sensor- Control System require a little bit of software. It is many ways of doing this, but I always tend to use a pre-tested design containing of 4 main parts:

Communication is always required as we either take instructions or send data/progress to another control unit. This is usually also the largest and most complex software component needed. Many designs will implement a communication protocol and the app as just an extension to this. Myself I use an Object Dictionary.

Object Dictionary is a generic database interfacing between multiple applications using the same data. In its simplest form it is nothing but an array between data communication and sensors/actuators mapping data. A more sophisticated feature often needed is data integrity. As communication is capable of writing partly data we need a mechanism to commit or rollback so that the application only see consistent data sets. Another feature is the capability for persistent storage on selected variables or straight forward database queries.

The various user modules are Actuator(s), Sensor(s) and various other modules either using or providing data.

The last bulk of code is the infrastructure with RTOS and utilities.

The main issue here is that this design only need a map of data in the object dictionary, the right modules added and it adapts to any actuator sensor design.

Universal Motor Controller – Actuator Control System

I have a few electronic designs that annoy me simply because I lack time to work on them. The reason is simply to much happening in RL with projects (have to pay the bills) + focus on Software. This one is the worst. It is actually one of my most advanced designs and a very capable Actuator Control System.

I started this partly because I wanted to make my own 3-phase motor controller. But, as I did the design I also added a 4th Half-Bridge, Hall Sensors, Temperature Sensors, End point Sensors, Resolver input as well as the RS-X port. It is much better 3-phase motor controllers than this around, but that’s the point – this is not a motor controller it is a scalable Actuator Control System.

I

I blogged a lot about MicroPLC/Home Automation lately, and this design fit’s right into this scheme. We can’t use long wires with actuators involved as they need to be close to the objects they control (high currents). A centralized PLC design is not optional in a home that actually need distributed unit’s like this.

I will get down to it, but for now I want to focus on getting the HMI running. One of the first projects will be test applications for these devices.

The concept I will use is that the HMI Browser contact this device and upload the HMI. So all you install on the desktop, phone or tablet is a HMI Browser. This is similar to things you know from classic Web Browsers and HTML5, but the main difference is that we operate on a closed, industrial network consisting of a combination of technologies.

One aspect of easyIPC that I have not mentioned is that you have a set of HMI & devices that actually are a closed, industrial loop. It is not connected or available to internet or the outside world unless you want it to. Neither will you be able to connect any phone or tablet if it is on Wifi – the devices will need to be enabled from inside (white listed).

HMI – Image Editor

One of the tools I need to add for HMI Designer is a bitmap/Image editor. A simple bitmap editor is easy to create just using an array of 32×32 positions and allow the user to set colors to them.

One technique could be to allow an image to be drawn in full size and then converted to various sizes like this example based on MSPaint.

Doing this using my existing diagram editor would be straight forward, but I would also like the capability to import various formats.

The primary usage is bitmap/tools in HMI Designer itself, but this is also an important part of any HMI designer. Doing this in a vector based drawing tool lgive the advantage of full scalability, so combining this with a controlled capability to create faste, fixed bitmap’s as output might be an idea.

UML – Modelio

Testing a new UML tool “Modelio”. This is a GPL, open source. Obviously made in and for Java. I quite like parts of the tool, but I admit that I find it a bit slow to work with yet.

They have however done some clever thinking around lines in the class diagram. Rather than having separate lines the tool allow lines for inheritance to be combined. Inheritance symbol (triangle) is a bit small for my tastse.

Saving a project is slow so I suspect the format is a database rather than XML. I find it a bit clumsy to add attributes and functions to class, but I also admit that I don’t know the tool yet.

What I don’t like with some Java applications is that you actually notice that it is written in Java – it is that slow. But, speed of the app itself is not critical, more critical is the speed of work once I know the tool. I did however like that I can edit directly in the tree at left, so speed here might be an issue of learning the tool.

HMI – Basic Tools

The table below show the basic tools I plan in the HMI Designer. This tool group is just to get us started and cover the basics that need to be in any GUI design. The list is not complete. Once this is covered we will move on to more advanced gauges and UI components.

Select Tool Allow you to click & select other components, select an area, move or resize components. Select tool will be top left in any group.
Rectangle A standard rectangle on screen with colors, borders & text.
Ellipse A standard ellipse on screen with colors, borders & text.
Polyline A jointed line supporting color & style.
Polygon A symbol composed of jointed lines with colors, borders and text.
Line A simple line with color and style.
Button A classic button. We will support several button styles with properties.
Frame A rectangulare frame with or without border. Used to hold it’s own sub-group of components.
Checkbox A check/radio box with both classic and extended styles
Listbox Classic drop down list box allowing the user to select a pre-entered value. Will also have an option to  edit content directly.
Editbox Simple one-line edit box. Can be used for unfiltered or filtered text, numbers etc.
Textbox Multi-line text box. Allow you to write formatted text with some of the features found in word processors.
Label  A simple text label. Can be stand-alone or allocated to a component.
Horizontal Scrollbar  Horisontal scrollbar.
Vertical Scrollbar  vertical scrollbar.
TreeGrid A grid with tree options. Can be used as a grid, a tree or a combination. Many of the other basic components (not all) are available as in-line editors.
Toolbar A toolbar is basically a frame with selectable tools.
Console A classic, simple console allowing text out and in.
Real-Time Plot A specialised line-plot designed to support very fast plotting and lot of data. Can be used to view data curves or simple things like Oscilloscope alike plots.
Property Editor A specialised version of the TreeGrid that can be used to edit a list of properties.
Tab A Tab button allowing the user to select one of many page-groups.
Menu Bar A classic menu bar with various styles and options.
Pop Up Menu A pop-up menu.
Status Bar Status bar.
Title Bar Title bar.

A classic GUI designer will give you a dialog and allow you to design within it’s borders. We will suport this as awell, but I am also interested in designing on an unlimited scratch pad and letting the user select what is visualized by drawing “select rects” around the content. This works well with HMI designs that will cover more than is currently visible on a screen.

PLD – Variables

One of my concerns are visibility of data – variables. And this is one of the areas where we can take advantage of our graphic nature. As we display a diagra we can also show all variables available to that diagram at a simple tree-list at left (or right). We can also present tools to manipulate variables as well as descriptions.

I spend so much time going forth and back between screens looking at variable names, description etc – so this is one of the areas I believe a graphic language can do better. That said – this could also be done even on C or C++.

PLD – Executable Logic

The diagram above is a minimum PLD function similar to classic, empty functions. The only challenge here is lack of executable details.

This 2nd diagram show one way of presentaing executable details. This is key to our success, so we need to work a bit on this.

This last diagram show a possible single-step debugging technique. Notice that we display variable values and highlight diagram parts that is the next step. Again – we need to experiment a bit with this to see what works and what doesn’t.

Plain Logic Diagram – Terminator

I did a few prototypes to test a graphical programming language a few years back. First one in VC++/MFC and later one in C#/.NET. What I will do next is to write blog entries discussing the syntax and wrap this up as a language specification.

I called this “Plain Logic Diagram” (PLD) by accident and I will use that name for now.

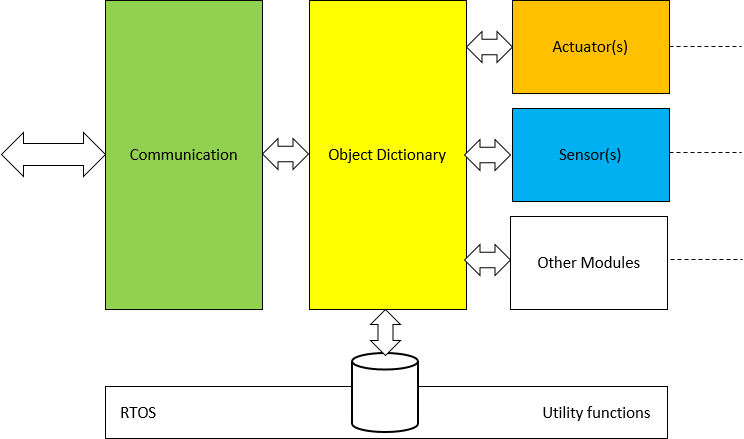
We have already described Plain as an assembly language, so this is a “compiler” that generate Plain assembly. The syntax is based on a combination of classic Flowcharts, SDL (Specification and Description Language) and some new concepts to take advantage of graphic diagram qualities.

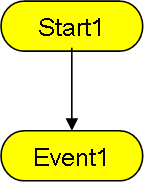
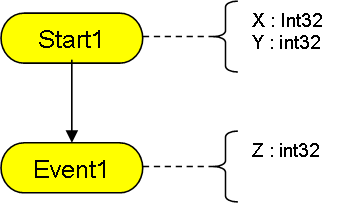
The illustrations I use will have to be created in various tools, this one show the terminators of a diagram and is drawn in PowerPoint.

A classic function have a start and an exit. We already know that Plain raise events with different output parameters. In the diagram this is shown as multiple exit terminators with associated parameters. The new part is that we also have multiple input paths with different parameters in the same diagram.

The key principle here is that one diagram is a function with multiple entry points and multiple exit points. Exit points are event’s that either are Static, Optional or Mandatory.

A Static event is a hard-coded jump to another diagram that can not be changed.

An Optional event also have a hard-coded default that the user can chose to override as he uses the function.

A Mandatory event must be present in the diagram using the function.

These are the same principles we decided on for Plain assembly events. In the real diagram we will add notifications to visualise these.

A diagram is the same as a “function”. Off-page connectors can only be through terminators, but a diagram can be as large and complex as you want. Logic is flow-chart like and will be instantly recognized by most people. This diagramming technique have been tested as executable specifications and have proven itself as a superior specification technique in front of customers. The only drawback is that you need a specialized tool to do this otherwise you just end up using far to much time creating diagrams.

So in short – the IDE and language goes hand in hand. A graphical language can only exist if we create a proper IDE/Tool for it.

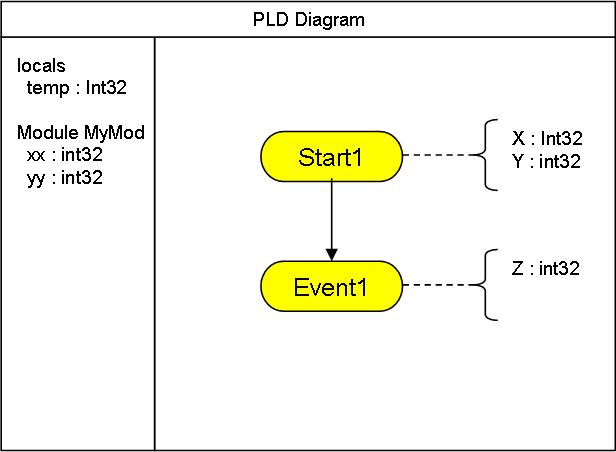
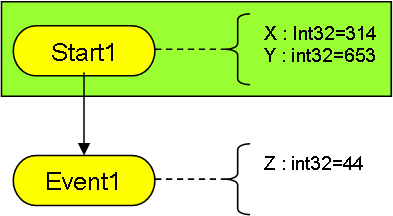
The diagram example shown here do however suffer from the issue that I can’t see the parameters. I see high level logic, but I don’t see the actual executable details. Also – what about local variables etc?

to be continued…