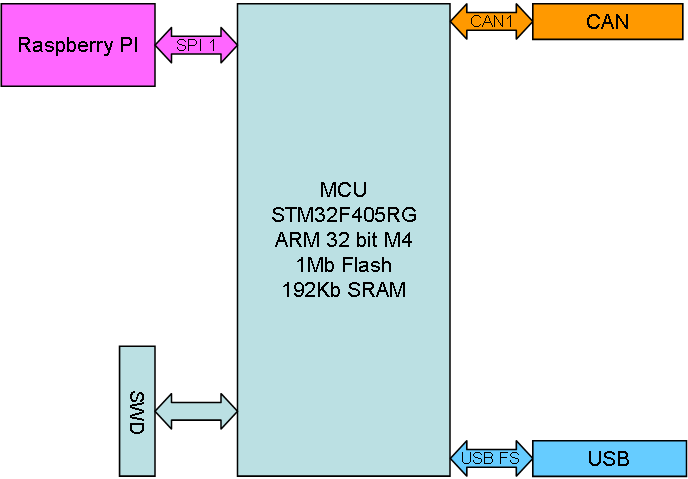
This rather boring drawing represent my new base for a Hat. Notice that I have removed the addressing scheme from the old ones, added USB and CAN as standard as well as Raspberry PI Hat form and SPI to communicate with the PI.
F405 is so fast that we can use higher SPI speed (ca 45Mbps) and I think we can achieve ca 30Mbps full duplex data, which basically is 60Mbps comparable to other standards. I can soft-switch on a SPI bus sending to one device and receiving from another creating a true device to device data stream. Removing the address scheme means that any device can become “Network Master” controlling this. I will return to the Software design tricks here in a different article.
I have one challenge here – how to identify a device? F405 have a Random Number Generator allowing me a safe way to guarantee that two devices behave different. Each of the F405’s also have a unique 96 bit ID. Using this in combination I can manage to tell the network master that we have a new device and get it allocated a time slot. I know F405 is up for the job, but I am more concerned about Raspberry PI due to the Linux core. The SPI on the Broadcom do not have the same support as you have on a F405, but lets see what we can achieve.
CAN is the actual control bus here. Can is excellent as it also allow up to 1km cable between devices. It does not cover the same speed as a SPI, but it is a classic in control systems. I am as many of you know a big fan of RS485, but CAN have it’s advantages as well. It is a bit more difficult to wire, but used here as a backbone net on short distances it is excellent.
USB is a bit new to me, but this is basically a high speed 1:1 serial port. It allows me to connect and power the device stand-alone from a PC. 5V from USB is connected to 5V on Raspberry PI, so this will power RPI and the rest of the stack as well.
I use a new 6 pin SWD connector here. I have described this earlier. I am very happy with my old 2×5 pin, but I mostly only used 3 pins and it added a lot of complexity. I tried a JST Micro connector, but will return to a simpler 1.27 pitch header and an external adapter card to convert to ST.Link/V2 with a Boot and Reset button on the adapter. I also had an UART on the old one, but that is expensive (in terms of pins) and I never used it.
This will be my base for a series of board that I plan.
- 1 – Wifi board based on ESP32. This is intended as a low cost Wifi option compared to Raspberry PI. ESP32 is in most cases sufficient + it offer a CAN and RS485 etc.
- 2 – Communication Hub. This is covered in my previous article and will soon be ready. Communication options are basically so basic to any system that I find myself doing a lot of these variants. This includes a SD Card, Flash memory, RTC Clock, 2xCAN, 2xRS485, 2xRS232, SPI, I2C and USB making it a very powerfully Hub.
The next ones are an upgrade of earlier Hat’s.
- 32 channel Servo/IO Hat. This is one of my simplest, but yet most usable designs. STM32F405 is so powerfully that we get 32 ports in Servo format with +/- and a signal to drive a Servo, Digital In, Digital out, Analogue, In, Analogue Out, PWM Out, PWM In etc. I actually planned a GPIO board at one point, but realized that this board is so much more powerfully. And with 3 sides for connectors we should be able to do 32 channels a bit better than my existing board.
- DC Motor Hat. I made a 8x DC Motor Hat and plan to extend this. My existing board had some IO + 8x DC H-bridges. I will see how many ports I now can make.
- 3-Phase Motor Hat. DRV8313 is excellent for driving small 3-phase motors, so I want at least 3 motors – maybe more together with some IO. The focus is low speed position systems so the IO options will reflect this.
- 5-wire Stepper Motor Hat. It is some excellent, low cost (1 USD) stepper motors around that need a decent support board. Using ULN2003 I can support 7 steppers with 4 chips. This board need 2.54 pitch connectors since they come with the motors, but with 3 edges I believe that is doable.
- 4-wrire Stepper Motor Hat to drive more classic stepper drivers. In this case I plan 3 steppers up to ca 3A – standard for a 3D printer/CNC.
- High resolution Analogue input board. 8×24 bit ADC w/30Kbps speed ADC’s are available low cost and this needs a Hat.
- PWM Driver – 24V/1A. In fact this probably can be achieved in combination (or as a variant) of my 3-Phase Hat. Using DRV8313 and 3 x chips I basically have 12 x PWM channels.
- Heavy Stepper Motor Driver (MC4X60V50A) – I need CAN on this to be able to control it, but I do not want this directly into a stack.
- Heavy 3-phase Motor Driver. MC3P60V50A is a bit slipper than it’s 4X variant and focus on 3 Phase motors only. It has the same challenges that it can’t be directly connected on the stack.
- Isolated CAN Hub. Heavy motor drivers and long distances have some challenges where we need to consider isolation. I tested ADM chips just to discover that they get very hot, so I want to explore a different path. Due to size I am happy with 2 x CAN per Hat.
Most of this is consolidation of work I have done on this blog before, so it is not as much work as first impression might suggest. I am in general not scared of Electronics because I find it very easy and relaxing to do an hour now and then, and over time I achieve a lot. Writing SW for all of this is a larger challenge, but I only intend to make the basis so others can start programming this time.
I sadly need to make one assumption – the state of Norway plan to put MVA and handling fee on all import. This means that a small package that now cost me 10.- USD suddenly will cost ca 30.- USD extra in tax and bullshit fee’s. It will become a limiter on what I can afford to do in here. My only alternative is to start selling board so I can afford to continue. Without this I fear the electronics part of this blog will come to an end.
Thanks for reading my Saturday morning ranting 🙂