I still have a job to assemble a full 50A motor driver, but I want to set up the MCU with correct code first. I use IR2103 that will prevent short-cut, so we should be safe, but it is better if we have pins & IO ready. CubeMX is great for this and it also add in FreeRTOS and USB Serial. The later is important because I want a debug UI to operate the channels through USB.
CubeMX auto-generate drivers and configurations as well as producing a PDF report that is a good starting point. It also integrate directly with SW4STM32 (IDE) so you basically just press a few buttons and have your code running.
Just to remind everyone of the content on this controller:
- STM32F405RG ticking at 168Mhz, 1Mb Flash, 192Kb SRAM
- Rated for 60V at 50A
- Raspberry PI Hat format enabling other boards to be added for more functionality.
- Separate PSU for processor
- Supercap and motor capacitors on board.
- USB Interface
- CAN Interface
- SWD
- 2 x End-point connectors
- 3 x Hall sensors
- 3 x Status Leds
- 4 x separate PWM channels
- 4 x high-side current sensors
- 4 x BEMF sensors
- 1 x DC Input sensor
- 2 x on-board temperature sensors
- TVS on all signals between MCU and Driver
MOSFET’s are 60V rated for an insane 160A and 400A in pulse drain. Well above the 50A target of this board, but as I have shown though math current limit is also about power disipation. And to repeat myself – at present I have equipment to test ca 10A. I actually need to build some PSU’s for heavier testing.
It is a lot of low cost motor controllers out there, but this one is actually designed to sustain 50A as a constant load and it is one of the few universal controllers supporting stepper motors this size.
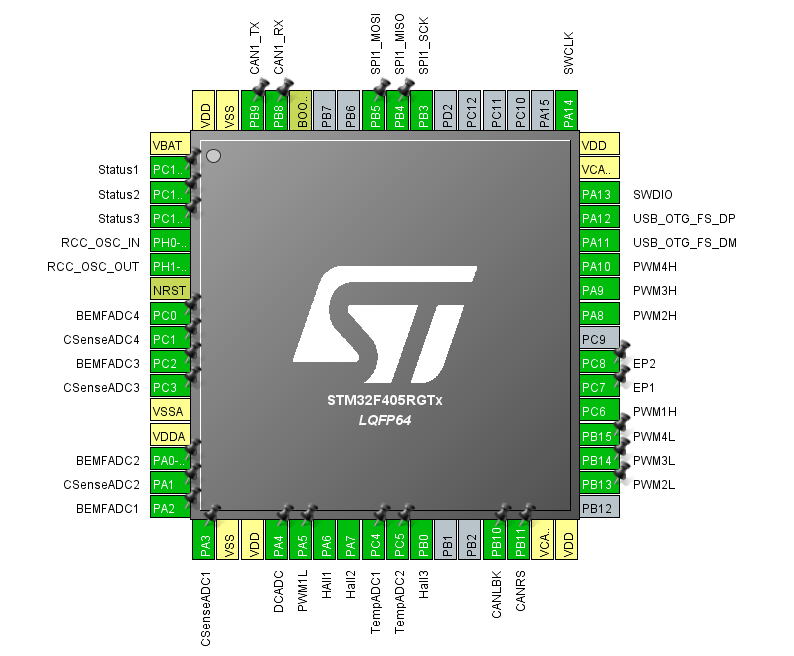
The following table show the pin layout and usage on rev 1.1 of the universal 50A Controller.
| 2 | PC13 | Status1 | Status Led |
| 3 | PC14 | Status2 | Status Led |
| 4 | PC15 | Status3 | Status Led |
| 8 | PC0 | BEMFADC4 | ADC measuring V out on channel 4. |
| 9 | PC1 | CSenseADC4 | ADC Measuring high side current on channel 4. |
| 10 | PC2 | BEMFADC3 | ADC measuring V out on channel 3 |
| 11 | PC3 | CSenseADC3 | ADC Measuring high side current on channel 3. |
| 14 | PA0 | BEMFADC2 | ADC measuring V out on channel 2. |
| 15 | PA1 | CSenseADC2 | ADC Measuring high side current on channel 2. |
| 16 | PA2 | BEMFADC1 | ADC measuring V out on channel 1. |
| 17 | PA3 | CSenseADC1 | ADC Measuring high side current on channel 1. |
| 20 | PA4 | DCADC | ADC measuring voltage in on driver part. |
| 21 | PA5 | PWM1L | Low PWM on channel 1. |
| 22 | PA6 | Hall1 | Hall encoder 1 |
| 23 | PA7 | Hall 2 | Hall encoder 2 |
| 24 | PC4 | TempADC1 | Temperature sensor 1 |
| 25 | PC5 | TempADC2 | Temperature sensor 2 |
| 26 | PB0 | Hall 3 | Hall encoder 3 |
| 29 | PB10 | CAN LBK | See CAN. |
| 30 | PB11 | CAN RS | See CAN. |
| 34 | PB13 | PWM2L | PWM ch 2 Low – TIM1-CH1N |
| 35 | PB14 | PWM3L | PWM ch 3 Low – TIM1-CH2N |
| 36 | PB15 | PWM4L | PWM ch 4 Low – TIM1-CH3N |
| 37 | PC6 | PWM1H | PWM ch 1 High – TIM8-CH1 |
| 38 | PC7 | EP1 | End Point sensor |
| 39 | PC8 | EP2 | End Point sensor |
| 41 | PA8 | PWM2H | PWM ch 2 High – TIM1-CH1 |
| 42 | PA9 | PWM3H | PWM ch 3 High – TIM1-CH2 |
| 43 | PA10 | PWM4H | PWM ch 4 High – TIM1-CH3 |
| 44 | PA11 | USB DM | USB |
| 45 | PA12 | USB DP | USB |
| 55 | PB3 | SCK1 | SPI for backbone 42Mbps |
| 56 | PB4 | MISO1 | SPI for backbone 42Mbps |
| 57 | PB5 | MOSI1 | SPI for backbone 42Mbps |
| 61 | PB8 | CAN_RX | CAN RX |
| 62 | PB9 | CAN_TX | CAN TX |