Plain – Parsing VM Instructions

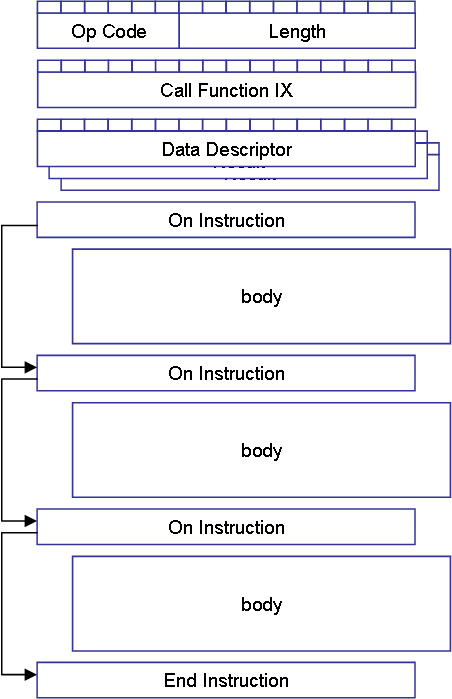
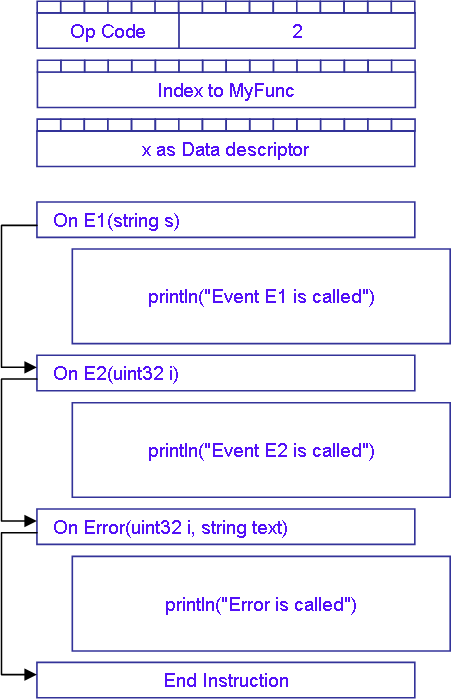
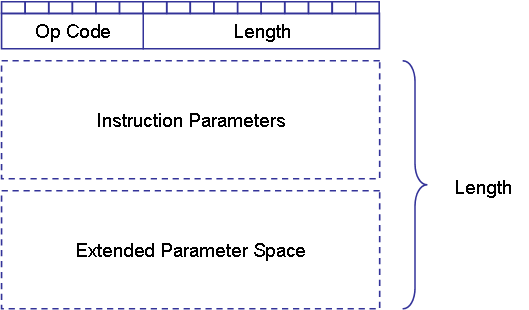
One concern as I implement the VM is the parsing performance on instructions. The Data Descriptor below illustrate the challenge. It is a dynamic structure with bit fields. For every bit field I end up decoding it causing AND /ROTATE instructions.

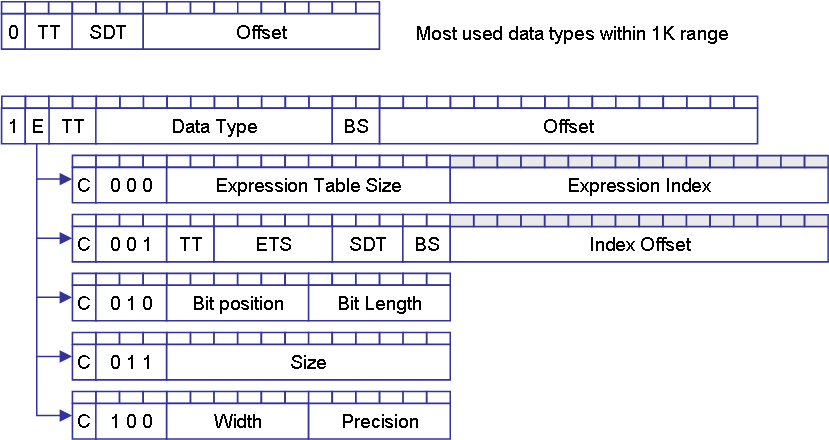
It is bit packed to save space, but decoding a bit-packed field will cost performance. To increase performance I could use more space – I can’t win, so this will be a horse trade.

For now I will ignore the challenge and be prepared to optimize this later. Plain is not designed for high speed, it is designed for high level logic, so I think it will be ok. I will do a performance test later.

The fastest “bit” packing is a XML string if you ignore space. This will surprice many, but a well build XMP parser is far faster than a bit decoder.

ESP32 PI – Raspberry PI Replacement

I have a few Raspberry PI Hat’s laying around and I wonder if I should make a ESP32 based replacement for Raspberry PI Zero W. The IO on ESP32 is far more capable than the one on the PI, but we have a few limitations and less pins to play with.This is an early draft with the 3D above and PIN mapping below.

Raspberry PI Pin ESP32 PI Description
1 3.3V
2 5V
3 8 – GPIO32 GPIO2 / I2C-SDA
4 5V
5 9 – GPIO33 GPIO3 / I2C-SCL
6 GND
7 10 – GPIO25 GPIO4
8 11 – GPIO26 GPIO14 / UART-TXD
9 GND
10 12 GPIO27 GPIO15 / UART-RXD
11 13 GPIO14 GPIO17
12 14 GPIO12 GPIO18
13 16- GPIO13 GPIO27
14 GND
15 GPIO9 GPIO22
16 GPIO10 GPIO23
17 3.3V
18 GPIO11 GPIO24
19 27 GPIO15 GPIO10 / MOSI
20 GND
21 28 GPIO2 GPIO9 / MISO
22 7 GPIO35 GPIO25
23 30 GPIO4 GPIO11 / CLK
24 31 GPIO16 GPIO8 / CE0
25 GND
26 33 GPIO17 GPIO7 / CE1
27 ID_SD I2C ID EEPROM
28 ID_SC I2C ID EEPROM
29 GPIO5 GPIO5
30 GND
31 GPIO18 GPIO6
32 GPIO19 GPIO12
33 GPIO21 GPIO13
34 GND
35 GPIO22 GPIO19
36 GPIO26 GPIO16
37 GPIO6 GPIO26
38 GPIO7 GPIO20
39 GND
40 GPIO8 GPIO21


SG90 9G Servo is no wimp

This litle Servo about 3 x 3cm is far from a wimp as far at current usage goes. A single Servo have no problem dragging a 10A PSU down – actually I think it’s the current regulation that is predictive, meaning it drops out because current raise is to fast – but, anyway – the only PSU I have that can manage this is a 80A battery.

I connecting 4 of these to my ESP32 Utility Driver and some of my dodgy wires burned up.

Looking at the scope I observe a small Voltage drop as the Signals pulse in. As I add servo’s it become worse. I think I need to alter my algorithm a little to spread the pulses out in time and avoid 12 servos that pulse at the exact same time. I also think I need to buy a 6V battery and ditch the 12V to 5V regulator as it most likely is this that dip a bit.

The ESP32 Utility Deriver does however work well. I am a bit puzled over my DPS5005 PSU’s. They seem to use a predictive aproach to regulating current.

ESP32 with CH340 Auto Reset Working

Been a long day with try & fail. I managed to get Auto Reset working on 1.0 by connecting RST to ChipPU amd DTR to GPIO0, but it only worked some times.

Walking back to my rev 1.1 I wanted to test manual loading and discovered it did not work either. Inspecting ESP32 I notice that I had missed a soldering – and voila… suddenly my progamming port work as it was supposed to.

1,5 days of fuzz for a bad soldering. A bit annoyed as I know I should have tested manual loading instantly to verify that I did not have a dodgy ESP32, but well.

ESP32 Utility driver still not working

I finally got new PCB’s for this utility driver and I still can’t get the programmer port to work automatically. All engineering is like that some times – try and fail – two steps forward, one step back. In this case it sadly involves waiting 6+ weeks for a new PCB once I find ut why it don’t work.

The logic with T1 & T2 should have driven the automation logic. I have double checked and this logic is used by many thought I also see a different solution used.

Well, next step is to use boot and see if I can program the ESP32 at all. After that I need to measure RTS & DTR to see if signals are as expected and basically see if I can tweak it to work.

Plain – Call Instruction

I decided to change the Call Instruction to the one below. As we return with an event code we consume the NIX and process the first “On” that will test for event code and continue to next “On” if not.

At this point I can consider dropping “On” and replace it with “If” or “Switch” – one lesst instruction to worry about. But, I will consider that as all instructions are drafted.

I really like this version of Call as it leaves me with a minimal function call if I don’t need On. Let’s test it out:

Func MyFunc(uint32 x)
    if( x = 1)
         Raise E1("Text 1")
    elseif(x=2)
         Raise E2(2)
    else
         Raise Error(x, "X is wrong value")
    end
Event E1(string s)
Event E2(uint32 i)
Event Error(uint32 i, string text)
End

uint32 x

for x=1 to 3
    Call MyFunc(1)
    On E1(string s)
        println("Event E1 is called")
    On E2(uint32 i)
        println("Event E2 is called")
    On Error(uint32 i, string text)
        println("Error is called")
    End
End

The annotaded figure below show hoe Call would be in this example. I will return to details about On Instructions later.The key with Event’s is that unless it is handled we do nothing, we just fall through. The function will mark Event’s as Optional, Mandatory or Static. If we must have a On we mark it as Mandatory etc.

Plain – Getting the details right

All the Plain entries in here have served their design purpose as I consolidate and wrap up Plain Specification. I usually never bother with a specification on software I do at home, but the complexity and technical design of both language and VM have to many details that needs to be right.

The new VM Instruction header is simplified as shown above.

The old “Object Descriptor” used for parameters have been replaced with a “Data Descriptor”.

The Expression Tables have been moved out from the Instruction and attacched as separate tables at the end of the Instruction Table.

The VM core will be modified, I will return to this later. The main difference is in the Data Descriptor, but also all the details that now get nailed down right so we can move on.

At the end I probably also need to clean up this blog my marking old Plain discussions as obsolete. This happens in engineering as you move forward improving designs.

3D Printer – Prusa i3 MK3 w/MMU

Josef Prusa recently launched 2 3D Printer upgrades that are worth noticing. One is the MK3 and the second is the new MMU Upgrade for the MK3. The total price of these will be something like 900.- EUR. I have copied pictures of them below:

MK3 implement new technologies that are very interesting comparing with what I have on my MK1 clone. The most noteable is the new print plates and the new controller board that uses the TCM2130, a Ramp with SPI allowing current (torque) sensing. This allows the printer to sence end stops.

Multy Material Upgrade with 5 different, or 4 different and dissolvable support material is also very nice.

The most important changes compared to my old printer is however the Marlin firmware and Slice3 slicer upgrades available in open source. That said, I must admit I consider saving up for the MK3 with a MMU. Videos demonstrating this is very convincing.

Brother DCP9015CDW

My first laser printer (a HP) stopper working after years of usage, and I have been in the marked for a color laser for some time. They had a Brother DCP9015CDP on sale, so I went for it.

This is a large All-In-One printer with Wifi. It was dead easy to set up and my wife was happy to see it install on her Mac. The print and colors are ok. I am not sure this is the best printer for photo prints,but I got a big surprice as I printed – it prints on both sides.

Prnter, Copy machine, Scanner and it is soundless except then it prints. The cost in my case was ca 300.- USD so I am happy.

Based on my previous experience I bought the laser some 10 years ago for 100.- USD and have used 3 cartridges costing ca 100.- USD in 10 years. The cost I had in inkjet printers was much higher and the double sided print will cut my paper cost by 50%.

The only thing I actually miss is A3 print for schematics, but I will survive.

Returning to Plain

A blog is excellent for sharing ideas down and returning to evolve them later. It’s been a while since I wrote about Plain. I basically stopped because I had other things I wanted to work on, but I think it is time to review/consolidate the specification and move on.

Is it worth it? Will it make a difference?

I work on PLC alike technology as a profession, and I am stunned by how much work that goes into even simple system changes. What I want to achieve is (1) plug in a new sensor or actuator, (2) automatically detect this as an unallocated resource, (3)  put it into a system diagram with a few clicks.

We will get there…