alStream

A MCU like STM32F405 have multiple serial devices and though their hardware is very different they perform the same job of sending/receiving ino. alStream is a base class for all components with a serial stream interface like USB, UART, CAN, SPI, I2C and even UDP/Ethernet. The objective is to provide a uniform messaging service where all interfaces of this type is equal except the Init() call that need to soft-wire the hardware. The draft consist of the following: 

  • Open() Open the stream.
  • Close() Close the stream.
  • Send() Send a message.
  • Receive() Receive a message.
  • SetReceiveTask() Set task to be notified  about received content.
  • SetSendTask() Set task to be notified about empty send queues.

The interface about will be repeated on all serial classes simply by using alSerial as base. alOS provide standard interface functions allowing alStream to interact with OS functions without any direct binding, so I use alOS::SetSignal() to make callbacks. That will signal a task to execute. Setting signals is better than a direct callback because it allows me to do the processing from within a tight interrupt routine. Also keep in mind that SetSignal increase a counter and that the task will be called once for each signal, meaning you have a natural mechanism for spreading bursts of messages out in time.

easyIPC SW Stack

This is the same as is on my previous entry, but I focus on easyIPC and Plain. easyIPC is a lot of modules to communicate with the rest of the system and while we easily can add user modules in C++, we can also add them in Plain.

Plain is compiled code running in a Virtual environment aJnd the strength is that Plain through easyIPC also can access resources on other Hat’s to form a larger system. This is a lot of work, but the objective is to make it very easy to build distributed systems and increase Productivity.


BasicPI Firmware Stack

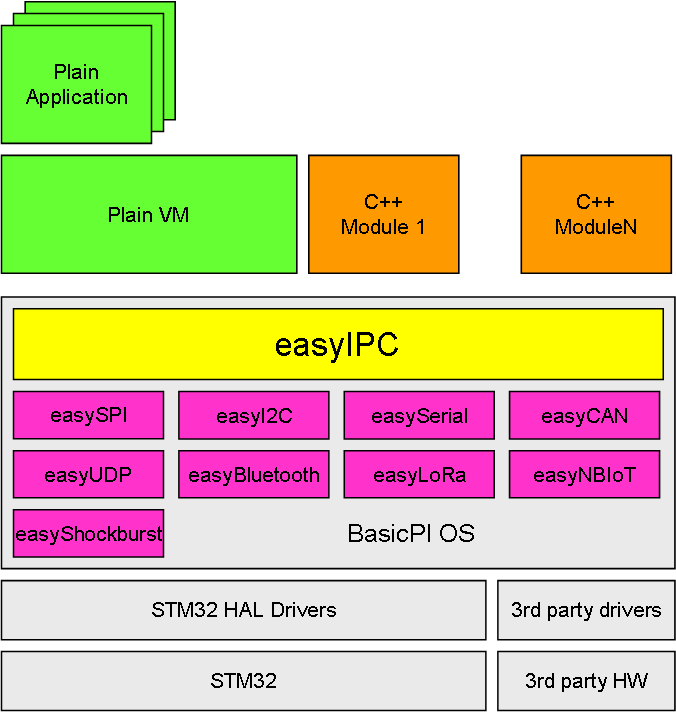
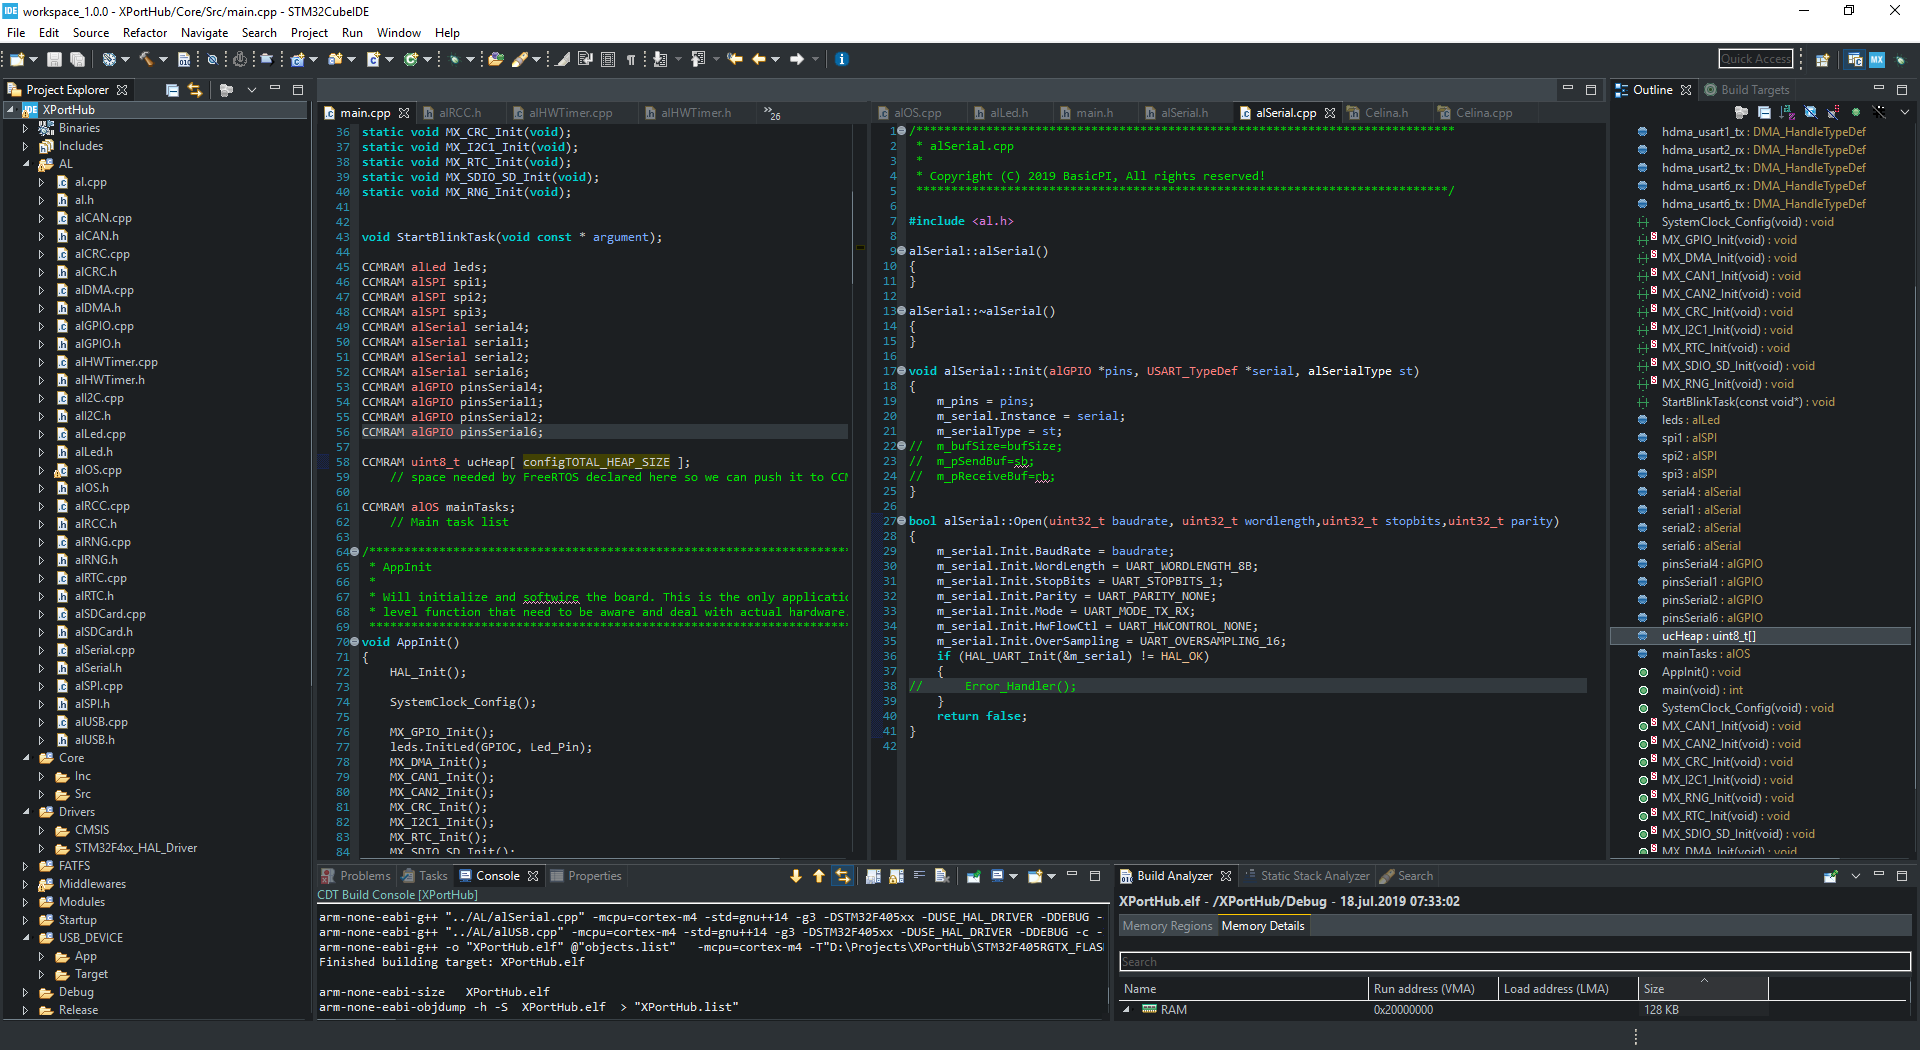
This illustrates the BasicPI Firmware Stack in progress. What I always do in embedded applications is to make a “standard” main.cpp as follows:

  • void AppInit()
  • {
  •    // wire hardware
  • }
  • int main()
  • {
  •    AppInit();
  •    // start OS
  • }

A team I worked in years ago agreed on this standard so we should be able to easy recognize the basic architecture in any application and avoid wasting time figuring out how main() works. How you do this is not as important as the fact that you and your team does it in a systematic way.

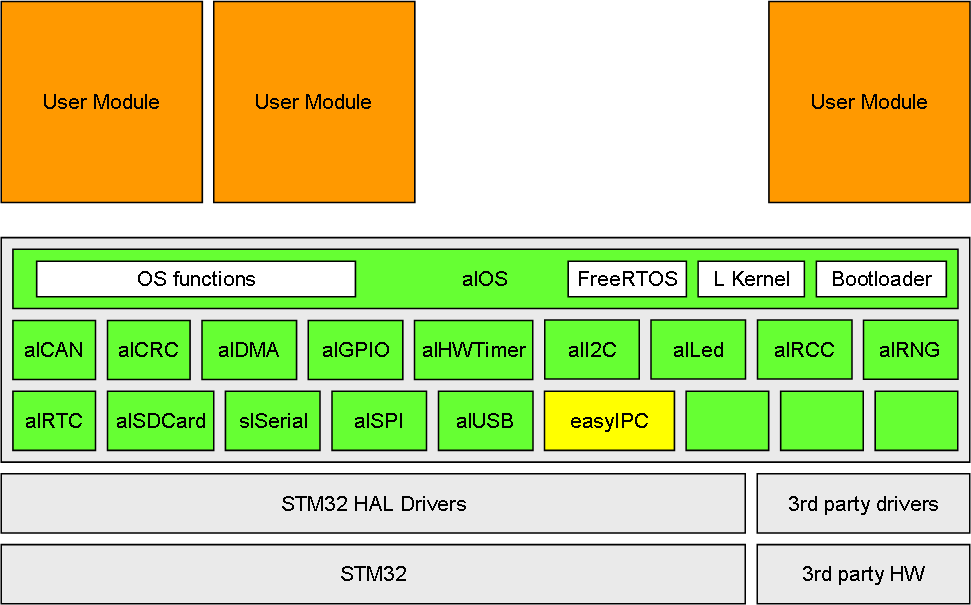
I use C++ so it is very easy to hide all external FW with an abstraction layer. I hide even FreeRTOS because I will replace it later. The modules shown here are just an example, it will be numerous others as I progress. The key is that I want a standard “OS” with known functions so that I can easily move move user modules from Hat to Hat, or make changes to the lower layers without worrying about required SW/FW changes.

Yes, this will bloat a little, but to be honest less that I expected. I use ST HAL drivers for now, but in highly optimized versions and I will remove some of them given time. Right now they are a conveniance.

FreeRTOS should not need any introduction. CubeMX offer installation of FreeRTOS with a single button and I found it easy to install and use + a thread shifter is always handy to have around. FreeRTOS is mature, open source and heavily maintained. The only abstraction I needed here was to hide the functions I needed to use.

L Kernel is a Linear Kernel that exist on top of FreeRTOS. FreeRTOS threads require stack and they can only change as fast as SysTick runs. L Kernel tasks needs no stack and they execute as fast as the MCU is capable of. L Kernel can also run without FreeRTOS and you control that from AppInit(). With no threads you can bit-bang if required and use a alHWTimer (or SysTick) to run a small list of maintenance tasks. L Kernel is also excellent for event driven schemes, buffer handling, software timers etc.

alLed is a funny, new extension – I decided that I use so much time blinking leds that I needed a system to wire it and support blink sequences. This allows an easy path for user apps to signal state through a led.

I threw easyIPC into AL on this drawing, but easyIPC itself is actually an user module, while alEasySPI is a specialized SPI driver. I can’t use alSPI for easySPI because I need to monitor the line for SW signals with very short reaction time. I set the spec to 4 ms, but < 1 ms is realistic. This is the drawback of the SW trick I use + running the SPI on 30+Mbps means it will require some CPU to process. I probably can check faster than 1ms, but that will take a toll on CPU usage. I expect that easySPI will require < 5% CPU usage With 1ms responce times.

I still have not tested Half Duplex SPI and it is busy in real life, and a hot summer with 35 degrees Celsius outside + SW is the largest task on my projects. It is one task that makes you realize how much work that has gone into the word “it is simple” on Arduino.

The upside with nice weather is however that I have to work in my mess of a garden, and my back usually kick in after while forcing me to go inside and sit still – an excellent excuse for working on my projects 🙂

Thanks for Reading!

XPortHub Rev 1.2 Annotated


  1. CAN
  2. CAN
  3. RS485
  4. RS485
  5. Terminal switch for CAN & RS485
  6. USB
  7. Micro SD Card
  8. SPI Flash
  9. RTC Battery
  10. Power connector
  11. I2C
  12. SPI
  13. TTL UART
  14. RS232
  15. RS232
  16. Raspberry PI Connector
  17. STM32F405RG
  18. SWD Connector

Changes from Rev 1.0

1 Corrected wrong SPI Flash package
2 Added resistors to SPI 1 to support Half-Duplex SPI
3 Replaced supercap with CR1220 battery holder.
4 Several PCB changes to optimize ground plane.
5 Changed DIP switch order to match port order on board.
6 Changed to new SWD header.

Sensor IO Hat Annotated

This is a 3D of my Sensor IO Hat Rev 1.0 that allow interfacing to 8 x Analogue/Digital sensors, 3 x I2C and 3 x SPI. STM32F405 have 16 x 12 bit ADC channels and each AD port have 2 IO pins that can be used . The Sensor IO Hat is about connecting to sensors as it have no sensors of it’s own. The only extras here is the Flash and RTC. 

  1. Standard CAN port.
  2. 8 x AD port consisting of 2 x Analogue/Digital Input/Output each allowing up to 16 analogue or digital sensors in total.
  3. I2C port
  4. Battery adaptor for RTC.
  5. Leds
  6. USB port
  7. 2 x I2C ports
  8. 3 x SPI ports with separate CS each.
  9. SPI Flash
  10. New SWD Connector.
  11. STM32F405RG
  12. RTC Oscillator
  13. Raspberry PI connector.
  14. TVS diodes giving a minimum of pulse protection to IO lines.

The block diagrams of these Hat’s are almost identical with exception of IO features and that is deliberately to make SW development easier.

The “New” SWD is based on 2×5 pin 1.27 pitch header and I removed the 5V and UART from the previous version. I tried a 6 pin using JST Micro but found them hard to mount on/off + I had some trouble with the added signal length. This design show here have however worked well and the 2×5 pins are easy to get. Even more important is that using a special male adapter I can program the board without soldering the connector at all.

All SWD connectors will be changed to this format and face in a direction making it easy to plug them in even if a board is in the middle of a stack. For now I still operate without a bootloader, but later I will only program the bootloader and use a USB + SPI to program Boards.

Linux Ethernet Switch/Router Hat

The most obvious Hat to use HLK-7688A on is a Ethernet Switch or Router with SPI backbone support. I have ordered a dev unit so I can test out this possibility. The Ethernet switch part is very straight forward, I also see a very decent SPI, but I need to dig a bit more into that before I decide on wherever this is a path forward or not. An alternative is to use the two UART’s to a classic STM32F405 if that does not work out or even use a STM32F407 and connect on the 5th Ethernet, but now it gets more complicated. I am also a bit concerned about taking on a work-load that includes a Linux distribution. I seriously hope this can be limited to making apps and a easySPI driver.

MT77688AN have 2 SPI’s, of which one do not have half-duplex and I suspect that the other already is connected to a Serial Flash, so using SPI for easySPI might not be straight forward or possible at all. But, that is something I need to learn more about.

One of the dev kits for HLK-7688 is a switch/router, so it is quite easy to just get the SPI lines and see if I can do what I want. I will obviously have a size issue on the Hat, but I can get a minimum of 3 RJ45’s + I can get more if I use 5 pin Micro JST connectors only – lets see.

The Age of Linux

Linux started seeing a serious increased usage in embedded projects with raspberry PI due to it’s availability and low cost. And the last years have provided a large number of low cost embedded Linux solutions. They are getting smaller, more powerfully and decreasing in cost making them very attractive in projects. Raspberry PI might still be the king, but it is far from alone these days. Having been involved in a few projects using Linux I must admit that it is very attractive to have a Linux Core as soon as you have Ethernet or Wifi involved.


The module above measure 18x33mm and run Linux. It is no comparison for the larger Raspberry PI or BeagleBone boards, but it cost ca 9.- USD , have a small size and some very interesting features.

This shows a block diagram. The module uses the HLK-7688A SoC and add 128MB Ram and 32Mb Flash in the module. This is supported by Linux/OpenWRT and one of the 19.- USD dev kits is a 5 port LAN/WAN router.

  • MCU is MT7688AN ticking at 580Mhz w/128Mb Ram and 32Mb Flash.
  • Size 18×32.8z2.8 mm.
  • Cost ca 9.- USD
  • Wifi with ITX antenna as well as supported on the pins.
  • I2S
  • I2C
  • SPI
  • USB
  • SD-Card
  • JTAG
  • 5 x Leds (GPIO)
  • 2 x UART
  • 5 port Ethernet 10/100Mbps
  • + more

The module above is Beaglebone TI AM3352 costing 19.- USD. A little to large to fit on a Hat size, but this one is a serious competition to Raspberry PI. It also have several bigger brothers. The main attraction with the Siera is that it also have PRU’s – co-processors capable of very fast IO.

Moving on I was initially planning a Ethernet module w/ESP32, but are seriously thinking about making a 3 port Router/Hat w/HLK-7688A. I just need to convince myself that the toolchain is available and easy to deal with. I am actually a bit spooked as this involves dealing with a Linux distribution, but lets see.

STCubeIDE Review 2

I have struggled a little to find an IDE I was OK with, but finally settled with STCubeIDE or Eclipse as it actually is. This is IMO one of the smarter moves that ST have done to support their MCU’s. The editor is “ok”, it compiles, download allow you to debug multiple targets + I get a more familiar feeling with the dark theme. It is load of eclipse add-on’s I have not tested, but I downloaded PyDev and can develope both Python 3.7 and 2.7 in parallell With full debugger support. The later is developed by a single developer who deserve credits for hes work, and it demonstrate one good argument to use Eclipse as base. As for Python the less I have to use that Language the better, but PyDev actually took most of the pain away.

It is still a few tricks using STCubeIDE and set it up, but it is worth it. One of them is how to add existing files to a project, but True Studio (as this actually was) is a big improvement over bare eclipse.

I am also using Code::Blocks on a different project yet since colleges have selected that and that works ok as well. But, despite my disliking of Java – I actually like STCubeIDE. The best is that I don’t need to know that this is written in Java 🙂 – I can actually be an user and focus on my own tasks and productivity.

This has actually been a showstopper for SW modules on my STM32 based components and I have finally started getting my act together and make a serious move on SW. What I will be working on for some time is the Abstraction Layer (AL). I am ditching the STCubeMX and autogeneration part. I autogenerated 1 project and use it to cut & paste as I set up the proper C++ project. Currently I am working on the abstraction layer to hide the C drivers and middleware packages completely behind a proper C++ layer.

One of the features I really like is the visual memory map showing you what is using what memory. It is still a lot of extra tools in STCubeIDE that I have left to discover, but that will come with experience.

I also tried setting up Visual Studio Code, but aborted simply because it is more an advanced editor than a proper IDE.

DSO150 Oscilloscope Annotated

DSO150 is very easy to use and operate like a multi-meter, and this caught my attention because the other Oscilloscopes I havve needs to be set up. DSO150 is basically only to switch on and use like a Multi-meter – you instantly see the signal and it was surprisingly easy to operate the HMI. I added a 9V battery to make it mobile and to avoid isolate the instrument. And all for a cost of ca 20.- USD.

Holding the OK button switched numbers on/off. V/Div adjust Y-scale gain and offset. Sec/Div adjust X-Scale gain/offset. Trigger select between Auto, Normal and Single shot as well as select between triggering on rising/falling edge. OK also hold the sognal so it freezes on screen. It takes a little practice to play and operate it, but once you get it into your fingers it actually is very functional for what it is.

It’s loads of things to complain about on DSO150 if you compare it to a professional Oscilloscope, but DSO150 cost 20.- USD and come in a form of a multi-meter. I actually only have one suggestion – add a battery holder and add USB. My point is that I do have Professional Oscilloscopes and this actually fills a gap between the multi-meter and those Scopes. I already had a small, hand-held Scope, but the HMI – button/knob solution on DSO150 is so more functional.

And yes – please chose a better MCU and increase bandwidth, but here is the catch – if someone does that it will not cost 20.- USD anymore. I need to glue a 9V battery holder on the back, but other than that this is perfect for those cases where I just need a simple scope solution to replace the volt meter.

The STM32F103C8 is a bit limited, but I can easily replace that with STM32F103CB or even STM32F303CC to get more Flash, SRAM and DSP power. I have not downloaded and played with the source code yet, but this is another attraction – an instrument I actually can program myself .

DSO150 – 20$ Oscilloscope

This Oscilloscope took me by surprise. I ordered it mostly for fun, but it turns out to be very functional and easy to operate Scope in a multi-meter format. 200Khz actually cover a lot of the activities I do and by attaching a battery you get a very handy, single channel Oscilloscope in a handy form factor.

The best of it is that schematics is open Source, firmware is open Source and it’s a hidden UART inside the Scope opening some possibilities. The quality is not the best, but a lot of times I just need to see what happens on a channel and this does that job perfectly.

The picture above show the PCB with 2 x GPIO ports, SWD port and an UART port. The MCU used is STM32F103C8. You can also see the EEPROM programmable via I2C as well as the extra Power Connector at bottom left. Below the MCU you can also see 2 test-Points that accidentally is the USB port. The Connector at top right is for the analogue Board that click on to this. All in all a cute little design. The DSO150 that I got is obviously a cheap clone. What I have done is to attach a 9V battery so it becomes like a portable multimeter.