Expression Parser

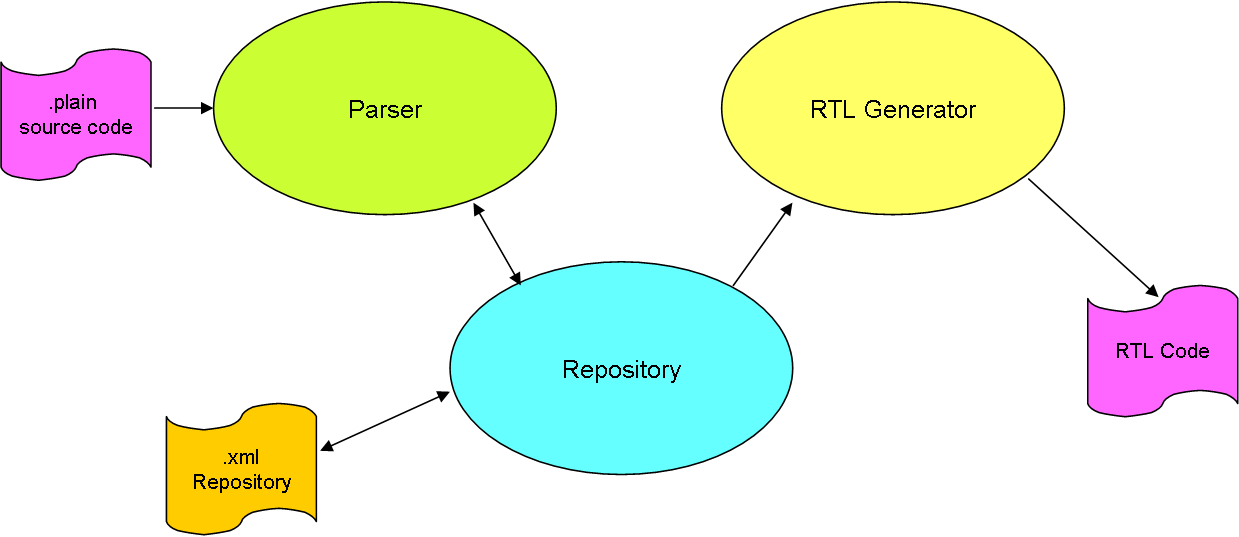
One key component of any Parser is the Expression Parser. This one is used to parse mathematical or logical expressions into a list of micro-statements. Plain have a separate instruction to execute math, but the parser need to build the list correct.

Example : 4 + 5 * 3

If we add 4+5 we get 9 and if we multiply that with 3 we get 27 which is wrong because * (multiplication) have higher priority than +. So the correct processing is:

5*3 gives us 15 and adding 4 gives us 19.

I have a preference for using tables to compute expressions. I need one temp table, a operator priority table and an output table for micro-instructions. The algorithm is quite simple as we parse a value and a operator before we evaluate the tree.

First is 4 +. As this is the first we can’t do any temp calculations.

Second is 5 *. Since * have higher priority than + we just add it to out temp table and parse 3 =. Our table will now look like this:

  1. 4 +
  2. 5 *
  3. 3 =

=is the highest priority so we now output a micro statement:

  1. t1 = 5 * 3

And we modify our table to the following:

  1. 4 +
  2. t1 =

Next we output t1 = 4+t1. t1 is our result leading to a small math script as follows:

  1. t1= 5 * 3
  2. t1 = t1 + 4

What we now lack is parenthesis, variables and function calls and we have an algebraic expression parser. Many language parsers will build the language on this, but my preference have always been to handle the language and expressions separately.

Dealing with this in plain was a challenge because a normal language would implement assembly instructions like Add, Sub, Mul, Div etc. At this point I decided to implement a math instruction that take the parsed tree as input to enable math to be done as close to C as possible. This keeps the instruction set small + it preserves execution speed.

Plain Syntax Alternatives

One of the challenges I have with Worldpress is to be able to show source code in here, so I apologize for the bad quality on the examples above.

The examples show one of my Plain test examples in 2 different syntax styles. the one to left is the currently chosen one and the one to right is the more C++ alike version and decided to leave for now.  My rationale is that some of the syntax is more difficult to express using CPP style and since Plain and C++ will co-exist it would create too much confusion.

Plain Assembler

The Assembler itself will read Plain source code and generate a RTL file that is downloaded to the device. RTL (Real Time Linker) is located on the target device and will convert RTL format to executable Plain VM instructions.

Most modern Assemblers are very similar to Compilers. The main difference is that the Assembler have a syntax that is close to the native assembly or in this case VM instructions. That said Plain is actually a high level language, so the technique used is a classic Descent Recursive Parser assisted by tables.

Any Assembler (or Compiler) will consist of 3 components; a Parser, a Repository and a Code Generator. The Parser read Plain code and convert it to a repository (database) over the code. Once done it call the code generator that in this case generate RTL Code. One of the differences with Plain is that the Repository is exposed and can be imported and exported as well as accessed through other applications.

The Repository need a XML repository file that define the target platform and available libraries/modules on that platform. This together with the Plain source code form the final applications.

While the assembler “PASM” is one application we will also have several other command line utilities and file formats. One is the output reports from the repository that can be used for IDE integration or libraries. Another is the download utility, but I will return to those in due time.

Plain has been a long coming system since I needed to create HW supporting Plain, FW supporting Plain, VM Engine, RTL as well as the assembler itself. It will still be on-going for a while, but I am not that far off demonstrating the first Plain applications.


Train Control System Rev 1.2

I started this blog with a Train Control System that basically failed big time on the positioning system. The solution I attempted was possible, but to large and expensive for small model trains. I later upgraded the control system to ESP32 which definitely is the path forward, but it is time to make another attempt on positioning as well. I will nor reveal the technique I will use yet, but this is low cost, small and have a very good chance of working as required.

The core functionality of the controller is a PSU consisting of a rectifier and a regulator giving 3.3V and 12V out.

ESP32 provide CPU power, Wifi and Bluetooth capabilities.

A standard H-Bridge allow us to control motors up to ca 0.5A

An external USB programmer is needed since we do not have space for the programmer logic on the controller.

The main challenge I have is size – even ESP32 is a bit big, but it is new , smaller modules around. The one I will use this time have an IPEX antenna enabling us to use a smaller board and hide the antenna a convenient place. It even exist a module smaller than this, but I have not had my hands on this yet. One option here is to replace ESP32 with a smaller ESP8266 module, but I preffer to stay with ESP32.

Another option is to separate the H-Bridge and PSU away from the main controller and position them closer to the motor. The advantage with this is the obvious separation of the noisy PWM components as well as space. It would also open for different, more powerfully motors or even multiple motors. The drawback is that we end up with 2 PCB’s as a minimum.

The position sender is a bit special and the receiver will be part of my Hat based control system. I will return to this in a later article.

The magic poof of smoke

I have done a mistake by leaving EN_BUCK floating. The doc is a little vage around this area and I have copied that from other references that probably was not using the Buck Converter. The buck converter works, but it seems to give very little out. 168Mhz uses more than 84Mhz and power starts misbehaving. I tried to solder EN_BUCK to 3.3V, but a short-cut gave the magic poof of smoke on the MCU + DRV8301 looks weird afterwards – next board I assume – blah – I will make another attempt on the Buck Converter tomorrow, but if not I will just move on. This change is however the only one that might force a new PCB so far because it is very tight and hard to fix on the current PCB.

Looking at schematics I see I shorted 3.3V to PVDD and basically feeded 20V straight into 3.3V circuits – blah – it means DRV8301 probably is OK, so I could rip the board to test the buck converter alone – can’t do more damage anyway :). Looking at TI’s reference schematics I am convinced my mistake here is EN_BUCK. Using 3.3V is however not optional here since 3.3V depends on the Buck Converter. I need to make a voltage split from 8-60V that drag EN_BUCK above 1.25V. Voltage is clamped to 5V internally anyway I notice. That is sadly 2-3 more passive components.

This design have some complexity so I would like to see PWM, Temperatures and Current Sensor logic before I order new PCB’s – I can do that by simply feeding the MCU from a 2nd PSU and avoid using the build in Buck converter. It is not ideal, but it allows me to test a bit more before I move on.

Noisy Buck Converter

The yellow line is 5V and the blue line is 3.3V. I connected my scope to see if I saw something and the good news that it is not an interference problem at all. I basically have a horrioble ripple situation out from DRV8213. This indicate that my capacitors are not doing its job at all. How this MCU can manage to work at 84Mhz is more of a mystery than why it does not at 168Mhz.

Frequency Interference

Testing Thunderstick I started to notice strange behavior as I increased MCU frequency – in fact I am unable to tick the MCU above 84Mhz powered from the DRV8301 Buck Converter. This indicate that I have interference between the Buck Converter and the MCU on higher frequencies. To prove my case I powered the board feeding it 5V directly and it suddenly works well on 168Mhz.

I have little experience with Buck Converters, but I assume I need to add a filter to separate frequencies. The challenge is that I have very little space to do so, so this will be a bit tricky to wire up and test. I could also try to change the value if the coil in the buck converter + I need to check datasheet for what frequency it uses.

It is also a bit tricky that I don’t have a Oscilloscope capable of seeing frequencies above 100Mhz, so I need to try to fix this blind. Adding a 10uH coil before the 3.3V regulator will probably do the trick, but it is a bit annoying as I should not need to do this – I might need to experiment with coils and capacitance on the Buck Converter to see if I can get rid of the high frequency ripple.

What is most likely happening here is that the Buck Converter generate high frequency ripple out as it generate my 5V power. If this is sufficient big and in the right frequency it will disturb the MCU as we try to achieve higher frequencies – well, for me to test and learn 🙂

Thunderstick working again

This MCU was hard to re-solder. You can see why by looking at the picture. I had a heck of a challenge with removing short-cuts and making sure every pin was soldered, but finally the Led blink normally and current usage is back to 10mA.

Another modification I need on some of the motor controllers are a EEPROM or FRAM to write data – I say might because I will only need that if I have a need to write things often. For now I can manage with a MCU Flash page for configuration parameters. The difference is that Flash can be written ca 100,000 times while FRAM can be written 10 trillion times. But, where should I put it ? Can you see any spare space on this board? I have to think about that one. But, for now I can start checking ADC readings – starting with DC-Rail.

Annoying misstake

What I have done here is to draw the circuit for DC-Rail and copied 2 resistor values without changing them – doh. I also assembled according to this and testet 30V, meaning I have injected 15V on a 3.3V ADC port – hmmm – wonder if that still works 🙁 To make things even worse – I actually have a not connected this to a TVS despite that I have one spare. That said – I also realize that some of these mistakes are unavoidable because as an engineer you reach a level where you have worked so long on a design that the only way forward is to test and find out what works what needs improvement. Maybe you could (as some do) spend far more time in design and avoid these errors, but my observation is that if you attempt that aproach you only end up using more time in design. My aproach is to forward a design to prototype as fast as I can to drive progress, but you have to find your own formula – whatever works for you. This one was annoying because I should have seen it as I assembled the components and I have wasted a day on an unstable MCU.

I fixed the resister, but the MCU is bust so I need to replace it.

I also discovered that removing even a resistor is close to impossible with the heat-sink on. So, at least the heat-sink work remarkably well. Mounting the heat-sink was required to test the mechanics, but I think I will continue without heat-sink and termal greace until we have a verified, working design.

Thunderstick Annotated

I have a strong preference for making some doc I call “Annotated Schematics” as I start coding and making a project. This doc break up and explain the schematics, programming info etc and everything I basically need as a SW developer to get going. The annotation above is the 3D model annotated to show content and position on the PCB.

  1. RS485
  2. RS485 terimator
  3. CAN
  4. CAN Terminator
  5. MCU STM32F405RG
  6. IO Connector
  7. IO Connector
  8. SWD old 6 pin format.
  9. Power lane for 60V+. Designed to solder on a 3mm wire if needed.
  10. MOSFET array. 3 x Half H-Bridge as classic for 3-phase design.
  11. Ground power connector
  12. 2 x Shunts to measure currents.
  13. Drill holes to mount heat-sink.
  14. Power lane for ground to cMOSFET’s.
  15. 2 x Temperature sensors.
  16. Power connector for 60V+
  17. DRV8301 Gate Driver, Buck converter and Motor logic.
  18. PSU components. 5V from DRV8301 and 3.3V from SPX3819.
  19. Ceramic crystal 8Mhz.
  20. Hall sensor/IO connector.

Testing on Thurderstick have gone remarkable well. Downloaded code yesterday and will start spinning 1KW motors today on 30V. I only have 30V/10A PSU for the time being and that should be more than sufficient for now as focus will be on the getting sensors and motor algorithm working.